The EATC Electronic Automatic Temperature Control Module:
 ...is a know issue with the Crown Vic, Grand Marquis, Mercury Marauder, and Lincoln Town Car. Ford should have fixed this wide spread issue and done a recall a long time ago, and they just got lucky that enough squeaks haven't been in the wheel to get this thing fixed right for free. In a nutshell, Ford (or a supplier to Ford) used crappy o-rings:
That failure's symptoms are you drive along and the air conditioner moves to the defrost under acceleration and to the floor under deceleration. At idle it may go defrost/floor or return to vents at times. The problem causing this is a vacuum leak within the EATC module itself which in turn is caused by these (in my opinion) limited life "faulty" o-rings.
The way to test if this fix is for you, is by simply unhooking the vacuum nozzles under-neath the dash,

...placing a tube where the black hose is, and suck. Does it hold a vacuum? If so this is for you, if not, it might be something else.
You have a few options:
2. Have a rebuilt one put in (anywhere from $200 to $400) and labor even more if you can't install it yourself.
3. Exchange yours on Ebay (risky? if not a high rating number for the guy) and then put it in yourself.
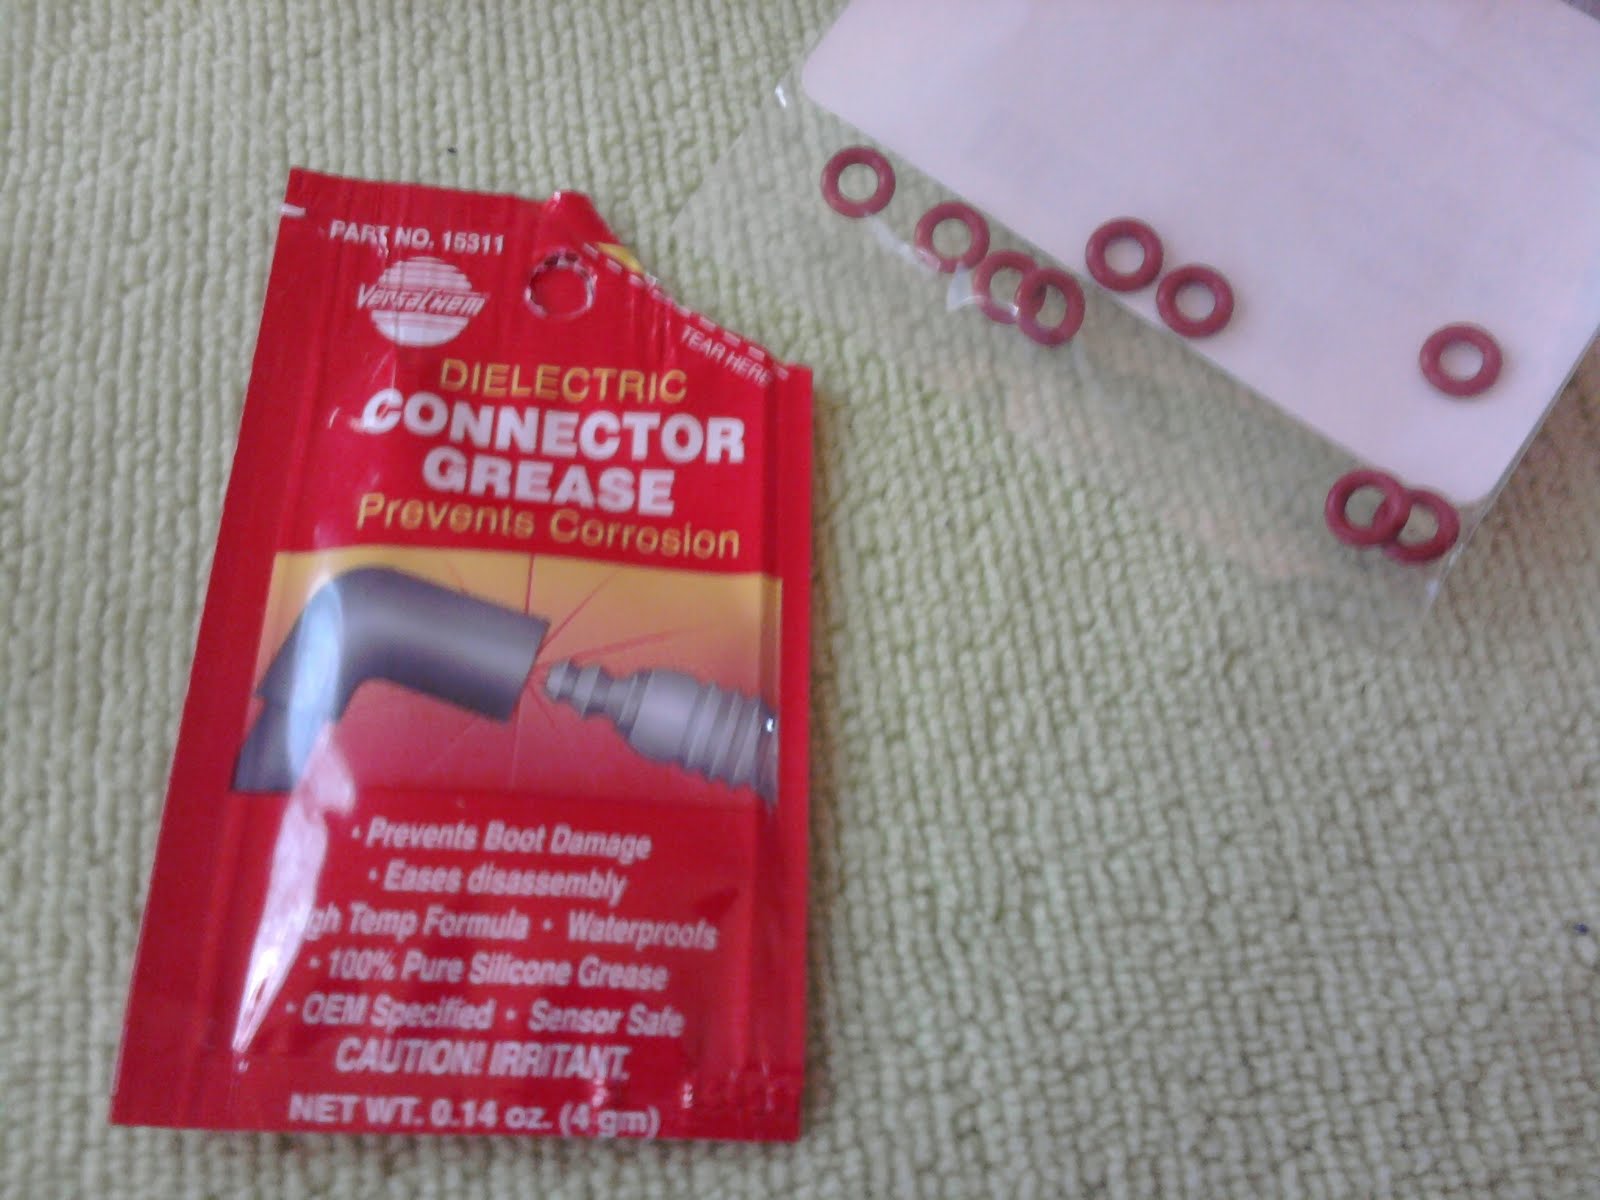
I got my replacement parts [ o-rings Silicone #007 Pk/10 5/32" ID x 9/32: OD 1/16" WIDE. PART #: ORS-007-10. Itchg #: ORS-077-10. Mer: 018402-01. ] from Amazon.com SMALL PARTS, Inc. (800)-220-4242. They got here in two days (paid extra for fast shipping) and I think it was around $13 which most of that was because I paid for two day shipping.

The T20 Torx screwdriver was around $6 bucks.
The silicone lubricant,

 ...and some normal tools you probably already have were around $15.
 As you can see, nothing close to $400 to $900.
Let's get started, I took a lot of photos to walk us through.
1. Pay Ford around $600 bucks to get a new EATC put in (parts and labor even more, I've heard upwards of $900, ouch!).
2. Have a rebuilt one put in (anywhere from $200 to $400) and labor even more if you can't install it yourself.
3. Exchange yours on Ebay (risky? if not a high rating number for the guy) and then put it in yourself.
OR...
4. Do the repair to your current EATC yourself.
I got a GREAT write-up online from:
...by an author named JACook. He's a genius. The problem is the o-rings inside the thing. Gotta get the EATC out and take it apart and replace the bad "lowest bid" O-rings.
The silicone lubricant,

...die-electric grease,
It can be scary if you don't know what and where to do but in all honesty it was quite easy and the satisfaction of doing it yourself is always fun. And of course keeping the $400 to $900 in my pocket and not in Ford's is also a great thing.
Let's get started, I took a lot of photos to walk us through.
First thing is removing the dash panel...pull gently moving up and down and side to side (wiggling) the panel to get it to come loose. Slow, gentle, firm. Don't be harsh it isn't needed and you'll break a support:
 More removing of panel (note wiring in this photo is of the rear window defroster switch and in center the trip/reset/select switches have been unhooked already):
More dash panel removal photos:

Airbag light connector reverse view:

Airbag connector normal viewing angle:

Right Side of EATC:
 Left Side of EATC:
 Decoupling the vacuum tubes below (passenger side lower dash in foot well area left side) area:
Vacuum coupling while it is together:

Vacuum decoupled (don't take apart individual tubes from the main decoupler, you'll break them and/or rip off the tips) be gentle and pay attention there are two hooks (one on each side) holding them together:

Below you see me GENTLY pulling the vacuum tubes up from bottom and out main dash opening:

What EATC looks like when out a bit with wiring still attached at back and vacuum tubes moved to the right:


EATC removed:

EATC inside and on a "highly visible towel" so I don't loose parts:


This is what you are left with after the vacuum assembly has been removed and what we have been after all along and note the screws removed in upper left corner:


Two following photos showing the eight outer screws removed on the vacuum assembly. This shows the removal of the inner / center two screws with the small metal plate:


Now we remove the vacuum assembly from the plastic support structure:

Underside view as removal of vacuum assembly from plastic support structure continues:

Side view of the small metal tabs/pins in "down" / "factory" position which hold in the vacuum nozzels:

Straightened out the metal tabs/pins that hold the nozzels in they are on the right and left beside the yellow patch (two per nozzel):

With some "finessing" of the ends, the nozzels will work out of the assembly:

The vacuum nozzel, our problem is on it, the little black o-ring has to come off, please make a special note of the proper facing of the bottom spacer (seen on the left side under spring in this photo):

Removing the small factory o-ring from the nozzel:


Comparison between old (black rubber) and new (red silicone) o-rings:
 Don't forget the lubricant to get them off and on (be VERY stingy on the SILICONE based lubricant that you spray on the o-ring and make sure you don't use a petroleum based lubricant):
Putting the SILICONE red o-ring on the vacuum nozzel:

One down and three to go:

Showing where the nozzel came from:

What the nozzels look like in the vacuum assembly:

Clean the inside and ensure everything is lined up nice:

Removing the old factory black rubber (personal opinion: P.O.S.) o-ring from the vacuum nozzel:
 Putting dielectric grease onto the new o-rings:
 Minor note, be careful or the vacuum assembly will fall apart a little (easy to put back):
And so here we are and I'd like to take a special moment here and say I hate springs. They are useful and do a great job, but when they jump away it takes a lot of looking to find them. Spent around 15 minutes on this sucker trying to find him. Way under the couch and near the base board. How he got that far I'll never know. Special note: keep a close and careful consideration of your nozzels when they come out so the springs don't get away from you:
 Broke an old o-ring while removing it and I think it broke only because it was dry rotted:
 Number the nozzels as you complete each one:
 On the spacer (that little part below the spring) make sure you note how it goes, the part you see in this photo goes up toward the nozzel has a small round rubber seal:
.jpg) The part that goes down is flat and looks like that in the photo below:
The part that goes down is flat and looks like that in the photo below:Broke a new o-ring, arrrgggg, and that is why you order extra (I ordered ten and we only need four!):

This was how I bent the metal tabs / pins back down to hold the vacuum nozzels back in the vacuum assembly:

Vacuum nozzel back on the plastic support and now to put back the ten screws:

Ten screws back in including the two in the middle with the small metal clip, the hard part is now done:

Touch something metal (to remove static from yourself) and then reconnect the internal control wire from the vacuum assembly to the EATC control board laying it back together and replacing the two T20 Torx screws on the back of the EATC:


The following two photos are closeups of the T20 Torx screws, left side then right side:


Back in the car we are about to hook up our EATC to the car, remember where the black and gray goes?:

In case you forgot, black on the left, gray on the right of the rear of the EATC, photo is below:

You can't see it but there is air condition coming out of the vents below, IT WORKS!!:

Here is a closeup of the top right bolt/screw you have to put back in to hold the EATC in place, there are four in total, two on each side:

Reconnect the airbag light (special note, if you crank the car with this unhooked you will get an airbag light on the dash, if you cycle the car off then back on with it reconnected that light will go out because it will know the light is working again):


Ah, satisfaction:


Below are some assorted photos which may or may not be helpful:


when you say check the black hose for vacuum, do you mean the side that goes to the EATC?? can you explain the theory behind why you say this tells you that this fix will work if that is the case? thanks..
ReplyDeleteDave - the black hose to the EATC unit is the vacuum "feed" for the head, and then the other color lines are the "outputs". However, the service manual indicates that you should not be able to hold a vacuum unless the vacuum ports are plugged. What "should" happen is that you plug all the outputs with some golf tees or something, and then try to pull a vacuum.
ReplyDeleteAlso, the unidentified bolts in the picture are 7mm. :)
Thank you McGyver. This post was the most comprehensive I could find on line. I have been dreading this repair for 3 months. Decided to tackle it today and after $12 (I bought a large coffee when I went to the store to get the o-rings) and 1 1/2 hours I had cold air blowing from the front vents again.
ReplyDeleteGood work!
You should open a donation account. You are awesome. I feel like I owe you a check, for saving me quite a bit of Cash. Thank you.
ReplyDeletesidneytookes@msn.com
this was a great tutorial ... although i have yet to encounter this problem if u dont mind i would like to add that if anyone is having trouble with their EATC as far as not turning on the a/c clutch and if you have followed the diagnostic on alldata and it results in having to replace your EATC module dont be scared its usually going to be the relay on the EATC logic board underside the relay solder joints seem to like to "seperate" anywho a little heat n solder and goood to go
ReplyDeleteIf this thread is still alive, I am going to perform this repair. I only have the use of 1 hand but I do all my repairs anyway.
ReplyDeleteThis detailed tutorial should save me endless grief and aggravatio!
Will report results.
Finihed this fix successfully.
DeleteNot sure about the need for silicone spray.
The springs will not wander if left in the nozzle housing. And keep debris out.
Had to bend a tab twice and it did not break. A third bend I fear would break it.
Also I removed the soft rubber vacuum manifold and blew it out with computer compressed air can and contact cleaner.
Bought the o-rings from McMaster Carr. 100 for $4.50.
DeleteI have 95 left over. Send me a SASE and you can have some for free.
Thanks!!! You saved us $1,000. That's the estimate that I got from the dealer for the repair of this "unknown" problem. After purchasing the silicone spray and receiving the o-rings in the mail, I studied the pictures for 30 min and completed the job in about 30 min. I would not have attempted to do this without these instructions.
ReplyDeleteThank you very much, you should absolutely have a pay-pal donate button for the great step by step instruction and clear pictures you displayed. It took me 90 minutes from finish to start and now I am freezing my ass off! It worked perfectly.
ReplyDeleteGod bless you, you are a great man.
Mamoun
Hi! Thank you VERY MUCH!! I am fairly skilled, but for some reason this one was making me very hesitant. UNTIL I found this walk-through! I really appreciate the care and detail you invested. My feelings immediately changed, and though I had planned to wait to do the project until tomorrow, after seeing your walk-through I knew it was too simple to wait and endure the heat of the day. I had previously ordered the O-rings from McMaster (thanks for the link), so I had everything. Thanks to the commenter who mentioned the 7mm bolt heads and your explanation that mentioned the T20 - I walked to my car with everything I needed.
ReplyDeleteNow I have nice cold air blowing through the VENTS! and there is an authoritative "thunk" when I switch to def or floor. Clearly, there had been a growing problem that is now completely solved, and for less than $10!!
Thank you! Do we live in a great country or what? The willingness to help each other even in things as trivial as this, gives me a great deal of appreciation for the friendly nature of our country, passed down from our forefathers. Thanks to all of you!!!
Thank you for the blog I fixed my 2005 Grand Marquis it works great you saved me about $600 dollars.
ReplyDeleteYou are all very welcome, I just check back on this older blog for the first time in a long while and was blown away by everyone's nice comments. Glad I could be of help!
ReplyDeleteThis comment has been removed by the author.
ReplyDeleteThank you so much. I just finished this repair on my 06 Grand Marquis, and now I am ready for another Texas summer.
ReplyDeleteI just did this on my '05 Grand Marquis and it worked perfect. Thank you so much!!
ReplyDeleteHoping you visit this blog again. This was really great of you to share. Thank you.
ReplyDeleteI performed this task in a combined 60 minutes on my dad's '06 Grand Marquis. Okay! Maybe longer, I had to quench my thirst. One on removal, one on the transplant and one on reinstall. Too bad my '97 can't be that easy.
I have a repair for window motors. I'll have to make time to document figure out how to post.
You are just amazing! i appreciate your talent! used cars houston
ReplyDeletereally it is a good technique. in present time i am seeing this types of blog are more popular because any one can visit this very easely.
ReplyDeletehoses victoria
Made this repair. It works. But I screwed up the light control module by not disconnecting the battery. Now I lost the soft button instrument lights of the EATC, but not the main screen, and stepping on the brake pedal lights the front parking lamps as well as the brake lights.
ReplyDeleteHas anyone been able to re flash the LCM? The shop manual makes it look almost impossible except by a rip off dealer.
Richard,
DeleteIf you give me your address I'll send you an envelope
Fred )fremues@gmail.com)
Best service about air conditioner repair Houston TX,air conditioner service Houston TX,air conditioning repair Houston TX,portable air conditioner,air condition repair,heating cooling Spring Tx
ReplyDeleteac repair tomball tx
ac repair houston tx
I would like to thank you for the attempts you've received developed in composing this report. I am hoping the identical greatest work from you inside of the potential also. Really your imaginative producing capabilities has inspired me to commence my individual Blog Engine weblog now.Boulder limo service
ReplyDeleteBoulder Airport Limousine
Boulder limousine service
DIA Limo Service
Fantastic is all I can say. Easy fix and took me an hour. Thanks so much!!!!
ReplyDeleteMan... this work through was fabulous. Ordered the silicon O Rings online and installed them just as you detailed. Finished in 2 hours and now the AC on my 2003 Crown Victoria works wonderfully. Thanks so much.
ReplyDeleteJust wanted to say thank you very much for this writeup. The repair from Ford would have been $1,000, the part would have been $250 after $300 core refund, and repair would have been at least $75. I did it for $3.50 by buying the O-Rings locally.
ReplyDeleteSo, again... thank you very much!
Call us at 713-900-4559 to hire our well trained and experienced technicians for AC repair Houston TX at affordable cost.
ReplyDeleteGetting your car engine repair done can turn out to be a hectic task if not serviced from a proper service provider. For this you can trust the Car Engine Repair Markden because they are very professional towards their work.
ReplyDeleteApparently this will not work on an '02 CV. I got all the down to the valve removal & saw the valves are soldered in, not screwed in. Any ideas? I'm already out o-rings & other supplies...
ReplyDeleteOther blogs note that older EATC models have the valves spot welded to a metal frame but it should still be possible to remove the solenoids and replace the O rings:
ReplyDeletehttp://www.ford-trucks.com/forums/871862-air-conditioner-blows-thew-the-defrost-2.html
"Just did this on my 2000 Expedition last night, I think it took all of 15 minutes to change the 4 o-rings, what a difference in sealing ability. I put it back together and it now works GREAT. Mine was a little different though, as my solenoids and plenum are spot welded on a metal frame, and not screwed to a plastic one."
thanks alot great info
ReplyDeleteJust did this. Easy and quick. A/C nows comes out the front vent right away.
ReplyDeleteThanks
Hello! The test procedures above REALLY HELPED ME on phase 1 of troubleshooting. I replaced the O-Rings and THAT problem solved.
ReplyDeleteNow on to Phase 2 where I need some additional help. Now the EATC unit has defaulted (third time just last night) to HOT ONLY... I'd read where disconnecting EATC and letting it "reboot" would help and it worked twice successfully.
Now, it's "faulted" again. Does anyone know, or can anyone recommend an reasonable ($$wise) solution at this point?
Regards,
Ray W
Offering air conditioner installation Houston at affordable rates.
ReplyDeleteThe EATC Electronic Automatic Temperature Control Module: ... temperaturecont.blogspot.com
ReplyDeleteGreat -Just did mine this weekend. 2004 Grand Marquis. I did not have an issue but just being proactive. 2 O-rings questionable and 2 were so so. Changed all 4 to silicone . Should be good for another 11 years, lol!
ReplyDeleteI found all the parts to do this at an ACE hardware store. Great write up, works perfectly now! The hardest part was getting the dash apart without breaking anything. Just take your time and work from right to left and top to bottom and you will be fine.
ReplyDeleteI found all the parts to do this at an ACE hardware store. Great write up, works perfectly now! The hardest part was getting the dash apart without breaking anything. Just take your time and work from right to left and top to bottom and you will be fine.
ReplyDeleteExcellent "How-to" article. 2007 Crown Victoria LX Sport. $1.99 for 5 O-rings and 1 hour to do it, not rushing it helps.
ReplyDeleteThanks!
Thank you for the step-by-step process to repair this issue. Everything was explained perfectly. My car A/C is freezing me out now.
ReplyDeleteThis is a smart blog. I mean it. You have so much knowledge about this issue, and so much passion. You also know how to make people rally behind it, obviously from the responses. http://www.csacservices.com/
ReplyDelete? i have taken all the step + hook black air line holes to the blue dash vent and air blows through. But put the line back to the climate control unt no air through the dash vents. What's next that i can do ?
ReplyDelete? i have taken all the step + hook black air line holes to the blue dash vent and air blows through. But put the line back to the climate control unt no air through the dash vents. What's next that i can do ?
ReplyDelete? i have taken all the step + hook black air line holes to the blue dash vent and air blows through. But put the line back to the climate control unt no air through the dash vents. What's next that i can do ?
ReplyDeleteI really thank you for the valuable info on this great subject and look forward to more great posts. Thanks a lot for enjoying this beauty article with me. I am appreciating it very much! Looking forward to another great article. Good luck to the author! All the best!
ReplyDeletevacnjet.com
Great Information sharing .. I am very happy to read this article .. thanks for giving us go through info.Fantastic nice. I appreciate this post. auto repair brandon fl
ReplyDeleteThank you so much for taking the time to make this tutorial! It was excellent and with you help I just fixed my daughter's '06 Crown Vic. Great job and thanks again!
ReplyDeleteBrian
Nice article on air conditional repairing. People will get advice from it. So if you want more info about learn some tricks about car then Visit here.
ReplyDeleteMy 2008 Mercury Grand Marquis LS is doing this.
ReplyDeleteThank you for this detailed explanation. However, I'm not mechanical, so after reading each step carefully, I'm going to take mine in to have it repaired. But, I'm taking your pics and instructions with me.
Thanks again.
Its amazing how interesting it is for me to visit you very often.
ReplyDeleteHeating and Cooling Toronto
Panel Paint Perth|Panel Paint Perth
ReplyDeleteaudi accident repair specialist
Commercial cleaning and residential cleaning in Corpus Christi, TX delivered with the highest of professionalism and care for your home or office floor waxing Corpus Christi
ReplyDeletewhat's the solution if the blend door still doesn't work after the actuator was replaced? it's not stuck. wire connections maybe (?) is there any info on this situation?
ReplyDeletethanks for the useful article.
ReplyDeleteChiller Transport Services in UAE
very impressive post thanks.
ReplyDeleteBest Pizza Deals in Amityville
ReplyDeleteيحتاج مكيف الهواء الي صيانة دورية تتمثل في تنظيف الوحدة الداخلية والخارجية للمكيف عبر الغسيل بمضخات المياة وهذا يتطلب الحصول علي شركة متخصصة في غسيل المكيفات وذلك لانها تقوم بتنظيف مكيف الهواء في المنزل بدون فك او تركيب بما يتوفر لديها من عمالة فنية متخصصة ومدربة
افضل شركة تنظيف مكيفات بالرياض
Many thanx - I have performed this on two CV and one GM. Saved almost the cost of buying my fourth (2009)CVLX. Each time the repair was effected and got so many more miles with proper AC out of each car. I get them at around 100k miles and let them go at around 200K. Sad they stopped production a decade ago.
ReplyDelete